• Skip to content
  • Skip to primary sidebar
  • Skip to footer

Savory Tooth

Simple Tasty Recipes

  • Home
  • Recipes By Course
    • Mains: Poultry
    • Mains: Beef
    • Mains: Pork
    • Mains: Seafood
    • Mains: Lamb
    • Mains: Vegetable
    • Appetizers
    • Sides
    • Desserts
    • Breakfast
    • Salads and Dressings
    • Soups
    • Drinks
    • Snacks
    • Sauces and Dips
  • Recipe Collections
    • Instant Pot
    • Low Carb
    • Beef Dishes
    • Chicken Dinners

Instant Pot Pumpkin Cheesecake

Updated Oct 9, 2020Published Sep 25, 2018 By Julia 21 CommentsThis post may contain affiliate links.

Summary:
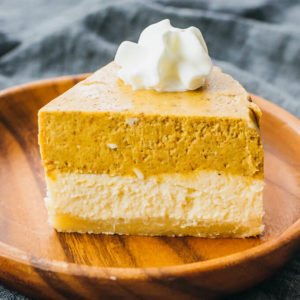
This recipe makes a 6-inch-wide layered cheesecake in a pressure cooker; no baking needed. A top pumpkin layer and a middle cheesecake layer are supported by an almond crust.
slice of pumpkin cheesecake on wooden plate

Instant Pot Pumpkin Cheesecake

4.2 from 7 votes
PRINT PIN EMAIL
Prep: 35 minutes mins
Cook: 40 minutes mins
Natural Release: 15 minutes mins
Yield: 6 slices

INGREDIENTS

Crust:

  • 3/4 cup almond flour (Note 1)
  • 3 tablespoons salted butter, melted
  • 2 teaspoons confectioners swerve sweetener (Note 2)

Filling:

  • 12 ounces cream cheese (Note 3)
  • 2/3 cup canned pumpkin (Note 4)
  • 1/2 cup confectioners swerve sweetener (Note 2)
  • 2 large eggs
  • 3 tablespoons heavy whipping cream
  • 1 tablespoon fresh lemon juice
  • 1 teaspoon vanilla extract
  • 1 teaspoon ground cinnamon
  • 1/4 teaspoon ground ginger
  • 1/8 teaspoon ground cloves

INSTRUCTIONS

  • Prepare: Set cream cheese, eggs, and heavy whipping cream on countertop to warm to room temperature, at least 30 minutes before proceeding with recipe (Note 5). Use separate pieces of 
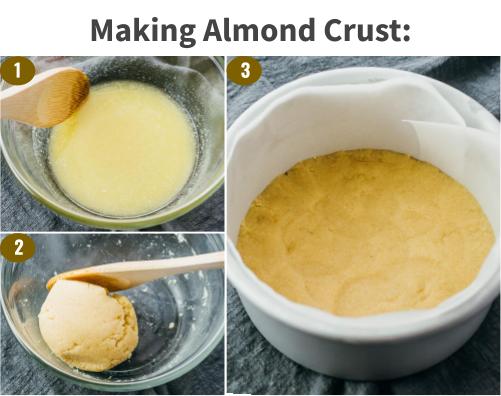
parchment paper to line bottom and sides of aluminum 6-inch round cheesecake pan with removable bottom (Note 6). Place trivet inside pressure cooker, with handles resting on sides of pot (Note 7).
  • Make Crust: Stir melted butter and sweetener in mixing bowl until combined, then stir in almond flour until butter is absorbed and forms dough. Transfer dough to prepared cheesecake pan, and use spoon or measuring cup to firmly press down and form flat, smooth crust covering entire bottom of pan. Transfer pan to freezer to chill crust for 20 minutes while making filling.
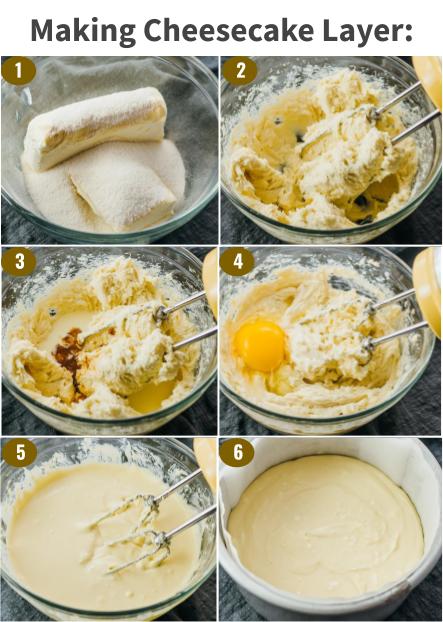
  • Make Cheesecake Filling: Beat cream cheese and sweetener in large bowl with electric 
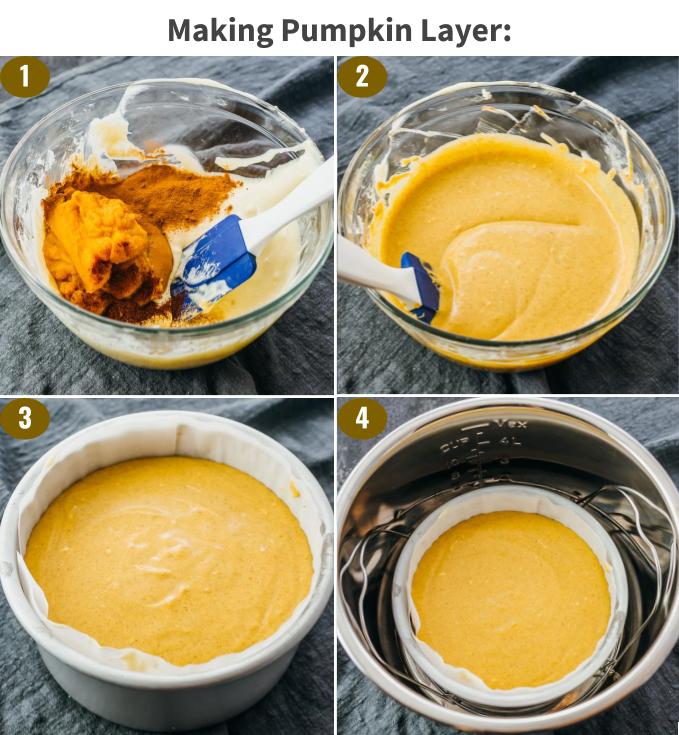
hand mixer on low speed until well-mixed, about 1 minute (Note 8). Add heavy cream, lemon juice, and vanilla extract; beat on low speed until smooth, about 30 seconds. Add eggs one at a time, beating on low speed until just combined, about 30 seconds each. Remove pan with chilled crust from freezer. Pour about 75% of batter over crust, being careful to avoid trapped air gaps. Flatten surface with spatula. Return pan to freezer.
  • Make Pumpkin Filling: Add pumpkin, cinnamon, ginger, and cloves to remaining batter. Beat on low speed until incorporated, about 10 seconds. Use spatula to scrape down sides and stir until well-mixed. Remove pan from freezer. Carefully pour pumpkin batter over cheesecake layer.
  • Pressure Cook: Pour 1 cup of water into pressure cooker pot, and lower cheesecake pan onto trivet. Secure and seal lid. Cook for 40 minutes at high pressure, followed by 15-minute natural release. Manually release any remaining pressure by gradually turning release knob to venting position. Carefully lift lid to avoid dripping condensation on cheesecake. If needed, use paper towel to carefully dab cheesecake to absorb condensation on surface. Turn off pressure cooker.
  • Cool Cheesecake: Let cheesecake cool uncovered in pressure cooker for about 1 hour. Use trivet's handles to lift cheesecake from pot onto countertop and let stand until fully cooled. Loosely drape dry paper towel over cheesecake pan and refrigerate for at least 24 hours (Note 9). Carefully remove chilled cheesecake from pan, and peel off parchment paper. Slice and serve (Note 10).

NUTRITION

Makes 6 Servings
Amount Per Serving (1 slice):
Calories 400 (84% from fat)  
Total Fat 37g 58%
   Saturated Fat 18g 91%
Cholesterol 146mg 49%
Sodium 290mg 12%
Net Carb 5.5g  
Total Carb 8g (Note 11) 3%
   Dietary Fiber 2.5g 11%
   Sugars 2g  
Protein 10g  
Vitamin A 85% · Vitamin C 1% · Calcium 9% · Iron 10%

PHOTOS

slice of pumpkin cheesecake on wooden plate
step by step making almond crust
step by step making cheesecake layer
step by step making pumpkin layer
close up view of pumpkin cheesecake slice

NOTES & TIPS

(1) Almond Flour. About 3 ounces weight. I use almond flour that is blanched, which means the skins are taken off of the almonds, so the resulting flour looks white. I typically use Costco’s Kirkland brand, which has 2 grams of net carbs per 1/4 cup serving. Some readers have enjoyed substituting or adding ground pecans or walnuts. Don’t substitute with coconut flour, which is more absorbent than almond flour.
(2) Sweetener. Crust: 2 teaspoons = 1/3 ounce weight. Filling: 1/2 cup = 3 ounces weight. Confectioners Swerve is a dry sweetener that measures the same as regular powdered sugar; it’s not the same as pure erythritol, which is about 70% as sweet. If you use a different type of sweetener, you can use the amount listed in the recipe if your sweetener also measures the same as regular powdered sugar. Otherwise, you’ll have to calculate the converted amount. Your sweetener’s packaging should indicate how its sweetness compares to sugar. If your sweetener is granulated, you can powder it by running the granules through a blender like a Nutribullet.
(3) Cream Cheese. 12 ounces = 1.5 standard bricks. Each standard brick is 8 ounces. I use regular, full-fat cream cheese from the brand Philadelphia, not reduced fat or light versions.
(4) Pumpkin. About 6 ounces weight of canned pumpkin puree.
(5) Room Temperature Ingredients. It’s important to remove cold ingredients — cream cheese, eggs, heavy whipping cream — from the refrigerator at least 30 minutes before starting the recipe. You want to give them time to come to room temperature, helping to ensure a smooth and creamy batter. Otherwise, you might end up with a lumpy batter.
(6) Cheesecake Pan. I use Fat Daddio’s aluminum 6-inch round cheesecake pan with removable bottom that’s six inches in diameter and 3 inches tall. If your pan is 7 inches in diameter, decrease the pressure cooking time by 5 minutes. I like the convenience of the removable bottom, but you can also use a springform pan. The sides and bottom of the pan should be lined with parchment paper so that the cheesecake doesn’t stick to the pan; no greasing needed.
(7) Pressure Cooker Equipment. I use a 6-quart Instant Pot. Other sizes of electric pressure cookers should also work as long the cheesecake pan fits within the maximum capacity. You’ll also need the trivet that came with your Instant Pot or a steam rack with handles. This will elevate your cheesecake so it’s not sitting in water. If your trivet or steam rack doesn’t have handles, you can make a foil sling to help you transfer the cheesecake out of the pressure cooker when it’s done.
(8) Mixing Batter. Don’t over-mix while beating the batter, or you’ll end up with a lighter and fluffier batter, resulting in an airier and puffier cheesecake. We want a dense, firm, and smooth cheesecake. At every step, the batter should be mixed until the ingredients are incorporated and smooth, and no more. I provide electric mixer time estimates in the recipe to give you an idea, based on a 5-speed KitchenAid electric hand mixer.
(9) Chilling Cheesecake. It’s very important to chill the cheesecake in the refrigerator for at least 24 hours before serving. This cheesecake is very moist after pressure cooking and needs time to dehydrate in the refrigerator. That’s why it should only be loosely covered with a paper towel, not sealed.
(10) Serving / Storage. This cheesecake is delicious by itself, or with a dollop of whipped cream. Store leftover slices in an airtight container in the refrigerator for up to 5 days or in the freezer for up to 3 months. Once frozen, thaw in the refrigerator overnight.
(11) Carbs. The nutrition calculation assumes you are using an erythritol-based sweetener that uses sugar alcohols like Swerve, whose carbs are non-impact and therefore not included in the nutrition estimate. Apps that count sugar alcohols will show a higher number of carbs.
(12) Recipe Development. This recipe is adapted from these layered pumpkin cheesecake bars that I often make at Thanksgiving and this classic New York style cheesecake made in the Instant Pot. Both recipes use almond crusts.

More Desserts

Tall stack of keto peanut butter cups that are low carb and sugar free

Peanut Butter Cups

close up view of ice cream

Vanilla Ice Cream

pecan sandies on parchment paper

Pecan Sandies

closeup view of keto fat bombs

Chocolate Chip Cookie Dough Fat Bombs

Filed Under: Desserts, Low Carb, Low Carb Thanksgiving, Per Serving: 5-10g Net Carbs Tagged With: almond flour, cinnamon, cloves, cream cheese, eggs, erythritol, ginger, gluten free, heavy cream, instant pot, lemon, more10ingredients, more60min, thanksgiving, vanilla extract, vegetarian

About Julia

ABOUT THE AUTHOR
Julia is a recipe developer and the founder of Savory Tooth, and lives in Boston, Massachusetts. Since 2015, she has been sharing simple recipes for tasty dishes in a user-friendly format. She typically prefers savory foods over sweet, hence the name of the site.

Previous Post: « Blueberry Muffins
Next Post: Cauliflower Crust Pizza »
4000
Did you make this? Rate this recipe:


4000
Did you make this? Rate this recipe:


newest oldest most voted
RENEE'

I am camping and using my Instant Pot for the first time camping and have made other cheesecake recipes that were a flop. Literally. This pumpkin cheesecake came out perfect and is delicious. Thanks so much!

Vote Up2Vote Down  Reply
5 years ago
Desiree

Loved this!!! Was light and not too sweet! Easy to make

Vote Up1Vote Down  Reply
3 years ago
yarnspinner2008

I made this for my mother’s b’day party, it was a huge hit! I love it and plan to keep the recipe. So easy!! Thank you so much

Vote Up1Vote Down  Reply
5 years ago
Eileen Jude Kay

Made this yesterday then tackled the swiss steak recipe…they were both EXCELLENT!

Vote Up1Vote Down  Reply
5 years ago
Karen

Directions say “Return pan to freezer” in step 3. Does not say for how long. Pls explain.

Vote Up0Vote Down  Reply
10 months ago
Julia

The pan should remain in the freezer until it says “Remove pan from freezer” in Step 4.

Vote Up0Vote Down  Reply
10 months ago
BigGma

I did not care for this cheesecake. Way too much lemon and a horrible aftertaste from the Swerve Confection Sugar. I was very disappointed.

Vote Up0Vote Down  Reply
1 year ago
Amber

What do you do with the other 25% of the cheesecake part?

Vote Up0Vote Down  Reply
3 years ago
Julia

See Step 4 — “Make Pumpkin Filling: Add pumpkin, cinnamon, ginger, and cloves to remaining batter.”

Vote Up0Vote Down  Reply
3 years ago
Michelle

1 cup of water in my 6qt Instant Pot was certainly not enough. I got “burn food” notice and the pot shut off (there was no more water in the pot) ..unfortunately, I have no idea how long it cooked, after 15 minutes because I have many kids and fires to put out. I’m going to put it in the freezer and hope for the best. I’ll be very sad if the recipe doesn’t work out for me, because it was all coming together so we’ll up to this point.

Vote Up0Vote Down  Reply
3 years ago
Julia

Since you had no water left in the pot, my guess is that the pot was not fully sealed. The knob should be set to “sealing” and not “venting” before pressure cooking.

Vote Up1Vote Down  Reply
3 years ago
Michelle

Could be, I’m trying out instant pot (I’ve never used one before this week, and a friend lent me one to try. I’m making all sorts of “wacky” stuff to get a feel for it). Anyway, my cheesecake still managed to turn out deliciously, despite my, uh, issues. Thanks for the recipe, and all the recipes. I’m having fun! (Also, a 7″ Springform pan worked out well for me…looking at a comment down below)

Vote Up0Vote Down  Reply
3 years ago
Lori

I ALWAYS forget to do that with my Ninja Foodie, when I made hard boiled eggs. All of a sudden there’s a slight smell of eggs and then the inevitable… psssss! Just found this recipe. Looking forward to making it!

Vote Up0Vote Down  Reply
1 month ago
Sara

Can this be baked in a conventional oven?

Vote Up0Vote Down  Reply
4 years ago
Julia

I have an oven recipe for pumpkin cheesecake bars: https://www.savorytooth.com/pumpkin-cheesecake-bars/

Vote Up0Vote Down  Reply
4 years ago
Lida

I dont have a pan that would fit inside the instant pot, currently 9 months pregnant and craving all things pumpkin!!! so wondering if this would work in individual ramekins ? would also keep me from eating the whole thing in one sitting lol

Vote Up0Vote Down  Reply
5 years ago
Julia

Haha ramekins would work, I just don’t know how the pressure cooking time would change since I haven’t tested that. Have you seen these pumpkin cheesecake bars? Here’s the link: https://www.savorytooth.com/pumpkin-cheesecake-bars/ They’re baked in the oven and are individual sized.

Vote Up0Vote Down  Reply
5 years ago
Frank

Could I tent the cheesecake with foil to prevent any condensation from dripping into the cake? I’m making this next week as a Thanksgiving dessert.

Vote Up0Vote Down  Reply
5 years ago
Julia

I haven’t tried that, but I imagine it would work well.

Vote Up0Vote Down  Reply
5 years ago
Debra H

Have you tried using any egg substitutes? I have to use a sub. because of my food sensitivities. This cheesecake sounds wonderful!

Vote Up0Vote Down  Reply
5 years ago
Julia

I haven’t tried any egg substitutes, so I’m not sure how they would work. Have you used them previously for cheesecakes? If so, they should work fine in this pressure cooker recipe.

Vote Up0Vote Down  Reply
5 years ago

Primary Sidebar

Trending Recipes This Month:

pan seared swordfish served on a plate

Pan-Seared Swordfish

close up view of microwaved artichoke served on plate

Microwaving Artichokes

chicken adobo with onions served on plate

Instant Pot Chicken Adobo

stirring cabbage and ground beef in skillet

Ground Beef and Cabbage Stir Fry

fried cabbage and potatoes served in white bowl

Fried Cabbage and Potatoes with Bacon

Footer

About

Terms And Conditions
Privacy Policy

Search

Copyright © 2015–2023 · Savory Tooth

MENU
  • Home
  • Recipes By Course
    • Mains: Poultry
    • Mains: Beef
    • Mains: Pork
    • Mains: Seafood
    • Mains: Lamb
    • Mains: Vegetable
    • Appetizers
    • Sides
    • Desserts
    • Breakfast
    • Salads and Dressings
    • Soups
    • Drinks
    • Snacks
    • Sauces and Dips
  • Recipe Collections
    • Instant Pot
    • Low Carb
    • Beef Dishes
    • Chicken Dinners