Summary:
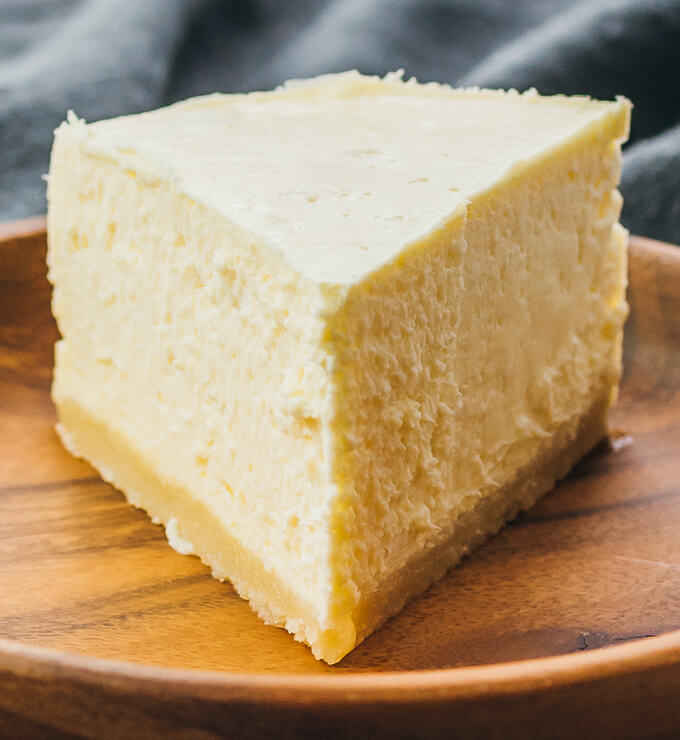
This New York style cheesecake with almond flour crust is rich, creamy, and smooth. Cheesecake is one of few desserts that translates well to a low carb version, without any difference in taste or texture. Using a pressure cooker guarantees consistently good results every time.

Instant Pot Cheesecake
Prep: 30 minutes
Cook: 30 minutes
Pressure Release: 15 minutes
Yield: 6 servings
INGREDIENTS
Crust:
- 3/4 cup
almond flour (Note 1) - 3 tablespoons salted butter, melted
- 1 heaping tablespoon
powdered erythritol sweetener (Note 2)
Filling:
- 2 (8-ounce) bricks cream cheese (Note 3)
- 2/3 cup
powdered erythritol sweetener (Note 2) - 2 large eggs
- 1/4 cup heavy whipping cream (Note 4)
- 1 tablespoon fresh lemon juice
- 1 teaspoon vanilla extract
INSTRUCTIONS
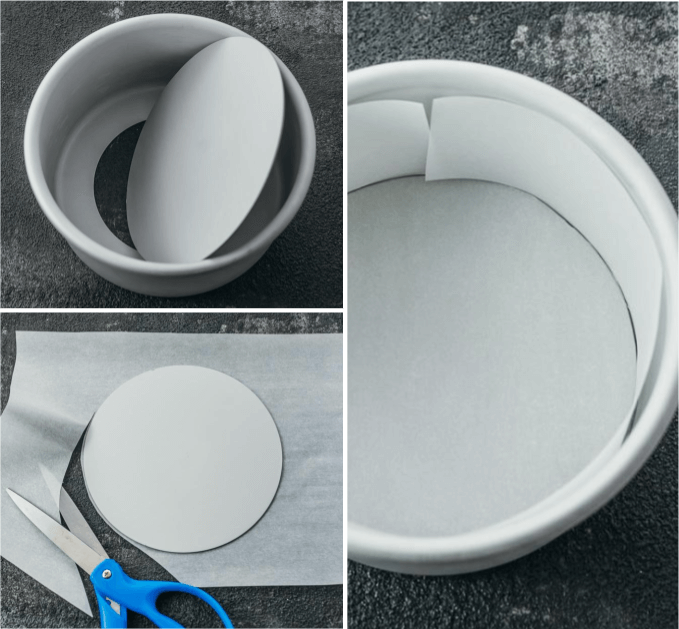
- Prepare: Set cream cheese, eggs, and heavy whipping cream on countertop to warm to room temperature, at least 30 minutes before proceeding with recipe (Note 5). Use separate pieces of
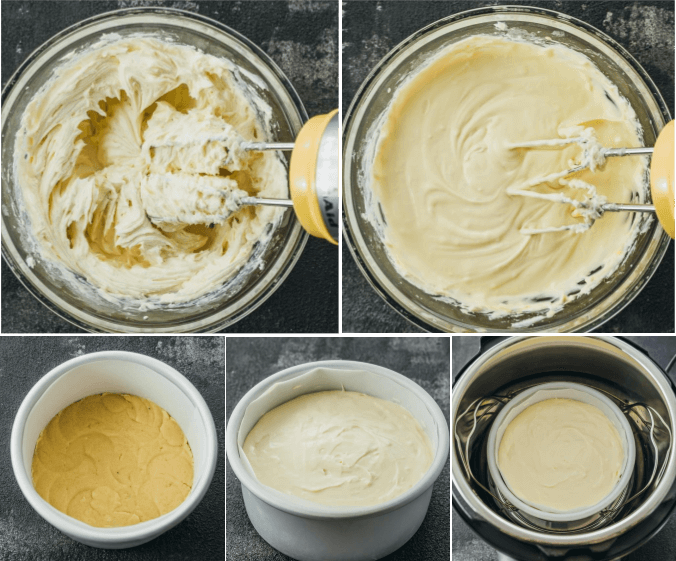
parchment paper to line bottom and sides of aluminum 6-inch round cheesecake pan with removable bottom (Note 6). Place trivet insidepressure cooker , with handles resting on sides of pot (Note 7). - Make Crust: Stir melted butter and sweetener in mixing bowl until combined, then stir in almond flour until butter is absorbed and forms dough. Transfer dough to prepared cheesecake pan, and use spoon or measuring cup to firmly press down and form flat, smooth crust covering entire bottom of pan. Transfer pan to freezer to chill crust for 20 minutes while making filling.
- Make Filling: Beat cream cheese and sweetener in large bowl with electric
hand mixer on low speed until well-mixed, about 1 minute (Note 8). Add heavy cream, lemon juice, and vanilla extract; beat on low speed until smooth, about 30 seconds. Add eggs one at a time, beating on low speed until just combined, about 30 seconds each. Remove pan with chilled crust from freezer. Pour batter over crust, careful not to leave trapped air gaps. Flatten surface with spatula. - Pressure Cook: Pour 1 cup of water into pressure cooker pot, and lower cheesecake pan onto trivet. Secure and seal lid. Cook for 30 minutes at high pressure, followed by 15-minute natural release. Manually release any remaining pressure by gradually turning release knob to venting position. Carefully lift lid to avoid dripping condensation on cheesecake. Top of cheesecake should be jiggly but not liquid. If needed, use paper towel to carefully dab cheesecake to absorb condensation on surface. Turn off pressure cooker.
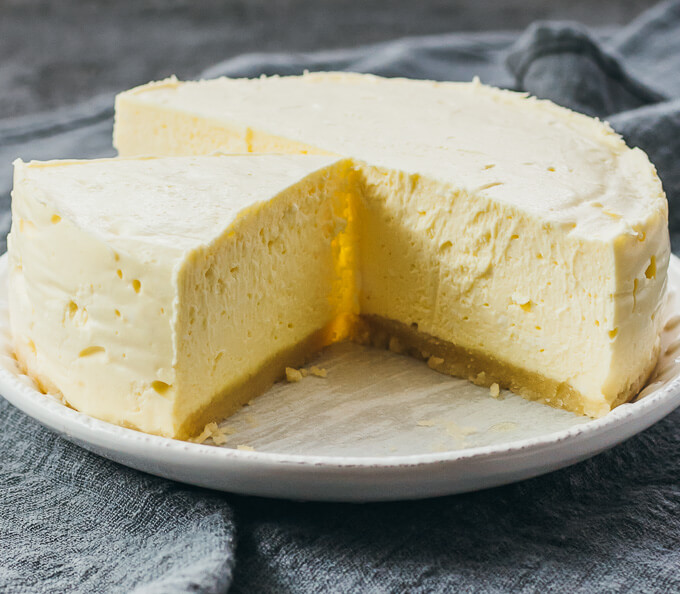
- Cool Cheesecake: Let cheesecake cool uncovered in pressure cooker for about 1 hour. Use trivet's handles to lift cheesecake from pot onto countertop and let stand until fully cooled. Loosely drape dry paper towel over cheesecake pan and refrigerate for at least 24 hours (Note 9). Carefully remove chilled cheesecake from pan, and peel off parchment paper. Slice and serve (Note 10).
NUTRITION
| Makes 6 Servings |
| Amount Per Serving (1 slice): |
| Calories 460 (88% from fat) | |
| Total Fat 45g | 69% |
| Saturated Fat 23g | 114% |
| Cholesterol 168mg | 56% |
| Sodium 370mg | 15% |
| Net Carb 4.5g | |
| Total Carb 6g (Note 11) | 2% |
| Dietary Fiber 1.5g | 6% |
| Sugars 1g | |
| Protein 11g |
PHOTOS


Hi Julia,
Wow, thank you so much for this recipe! It is delicious. My husband thought it was perfect: I would add a tiny bit more sweetener. It is wonderful with strawberries.
We took your advice and ordered quality flour and pure erythritol WHICH LITERALLY COSTS HALF THE PRICE OF SWERVE.
We can’t wait to try more of your recipes. We get to reap the rewards of all of your perfecting!
PEOPLE: This girl knows what she is talking about!!
I love this cheesecake. The only thing I do differently is let it do a natural release for an hour then remove lid and let it cool in the pot. I did this by accident the first time and loved the creamy texture. The next time I followed the directions and didn’t like the firmer texture.
I’m not much for baking, but this came out fantastic. I only had a 7” pan so I added 1 cup of almond flour and 4 T butter for crust and I also used confectioners swerve and used 78 grams of it in the cheesecake mixture. Same cooking time as stated in the recipe. Thank you for a great recipe and for including the measurements, it helped out a lot.
This cheesecake was delicious! Amazing! The single change I made was to increase the amount of erythritol in the batter by 10% to ensure it was plenty sweet. No doubt the most expensive cake ever as I had to buy all the ingredients including the push pan! Totally worth it! Thanks for this recipe.
I can’t stop making this cheesecake – and eating it! I’ve made one a week for months. I divide it eight ways and have two pieces on Sunday. Lol! I’ve experimented some with using juice instead of water to infuse flavors and adding other flavoring to the crust. Simply the best!
First time ever making a cheesecake let alone an instant pot one and it came out perfect! I topped mine with a keto raspberry purée.
Easiest, best cheesecake ever! I’m low carb and this hits the spot for my sweet tooth!
If I wanted to do 1.5 times the recipe since I only have the 7 in pan and want to get a taller cheesecake, would I cook for longer than the 30 minutes? I made your recipe last week and it is amazing! My husband is already requesting it again.
Glad to hear you guys enjoyed this, Elizabeth! I would cook longer than 30 minutes, more like 35 to 40 minutes.
This is the exact question I was going to ask because I wanted a taller cheesecake too!
This cheesecake for Fourth of July was a big huge hit even for the people that are on keto. My husband was definitely sad that we didn’t get to keep any for us so I went ahead and made another one this week so we would be able to have a cheesecake to eat for dessert! We eat it with strawberries or blueberries and whipped cream. It is the best cheesecake I’ve had hands-down!
My first time cooking cheesecake in the Instant Pot and it turned out perfectly. Very delicious! I add a tablespoon of speculoos spice to the almond crust which really made it pop. So tasty!
The texture was perfect! All went smoothly in the instant pot. Not even the slightest crack in sight. I followed the recipe exactly and used Erythritol. We waited almost 24 hours to dig in. It needed a tad more sweetness for my preferences, so I sprinkled Pyure (stevia) on top and it was much better. Also next time I’ll add Pyure and a little cinnamon to the crust. I followed the instructions on how long to beat various ingredients, and the author really was on point. We served with puréed mixed berries. I’ll definitely make this recipe again and again! Thank you!!
This was a fantastic cheesecake!! I added crushed hazelnuts to the crust and toasted them with the almond flour before making the crust. I also added a little almond extract to the filling with the vanilla extract. This was absolutely delicious!!
Haven’t made it yet, but plan to try it. The reviews sound great! Am wondering if anyone used MonkFruit Sweetener in this recipe? I presume the amount would be the same.
The taste is very good, nice and creamy texture. I will definitely make it again.
I baked mine in the oven. Had a tray with water on the bottom of oven….Perfect and delicious!
Your recipes never fail thank you.
What temp and for how long?
I have never commented on any recipes I’ve tried but this recipe has by far passed all of my expectations! The one thing that has been the hardest for me doing keto is finding a dessert to satisfy my sweet tooth. I have tried several low-carb cheesecake recipes and they always leave me wanting more. Cheesecake is my absolute favorite thing in the whole entire world and now I can have my cake and eat it too! It’s 99% like real thing. Thanks for sharing this recipe, you’ve changed my life!
I love the Keto program. I have lost 60 pounds now. So many good recipes to make. I make a Keto recipe in my double boiler with chocolate and almonds…. Just like eating a candy bar except it will not spoil the Keto program.
This was wonderful! I have tried other keto cheesecake recipes but this recipe is the best, and it was so easy! Will definitely be making this again. Thank you for sharing this recipe.
Off the charts good! I have made New York style Cheesecake for about 45 years, so I am not impressed with most cheesecake recipes. This one is very good, and done in short order via the instant pot. Thank You!!!
I made this yesterday and was surprised how easy it was. I was rather nervous at first because it was my first time using a pressure cooker to make a cheesecake. First time ever using Swerve also. I must say, the cheesecake was fantastic! I let it chill in the refrigerator for 24 hours before cutting. It was the perfect consistency and oh so flavorful. My husband did not even realize it was low carb. lol I will be making another one for Thanksgiving because we have several family members that eat low carb and this will be a hit with them too! Thank you for sharing this recipe!
Great website. The recipe ingredients and nutritional facts are set up the best I’ve seen from looking at many other sites. What a smart idea to put all that information at the beginning. Look forward to trying more recipes from your website.
Just made this for movie night with my boyfriend and friends. Needed a low carb dessert to die for and winner, winner chicken dinner 😂. Turned out simply amazing and soooo creamy. Followed recipe to the tea and had not one issue. Definitely a great way to tweak it into your own but super happy and will make again and again.
Awesome recipe! Have made several. Added some dark choc chips. Not a ton but just enough! Next I want to try making it pumpkin! Will let you know how it goes!
I too want to do a pumpkin one. Please tell us your results.
I have made this cheesecake several times and it always turns out perfect. Lately I have been playing with the crust-using part pecan flour, adding a little cinnamon and salt. Either way, this recipe is a keeper just as it is.
This recipe is fabulous. Every weekend I try a new cheesecake recipe looking for that low carb but delicious one. THIS IS IT.
I’m about to make it again, lol! Was a complete hit for my family and visiting little brother; he didn’t even know it was sugar-free! Pro Tip: Do let it chill as mentioned; it was soft and too tender to eat, but we didn’t feel like waiting. It was perfect the next day. I feel like that is ’nuff said 😉
You should add the refrigeration time and cooling time to the total cook time. Got all the way to the bottom and realized I had to wait another 24 hours to eat the cake! otherwise was really good.
Considering how much time can be spent shopping for ingredients and making a recipe, it’s definitely worth spending 5 minutes reading through an entire recipe before starting it.